
If you would like to achieve fast loading time for your WordPress site, crucial thing is to decrease the size of your pages. This could be the difference between website that loads in 1 second and one that feels like it is dragging. Enabling GZIP compression will help reducing the size of your webpage, which usually significantly reduce the amount of time to download the resources (CSS, JS, images and etc.), reduce data usage (bandwidth) for the client, improve the time to first render of your website page and improve the user experience.
All modern browsers support GZIP and automatically look for GZIP compression for all HTTP requests. Today we will share with you how to check and enable GZIP compression on your web server and your website.
What is GZIP Compression?
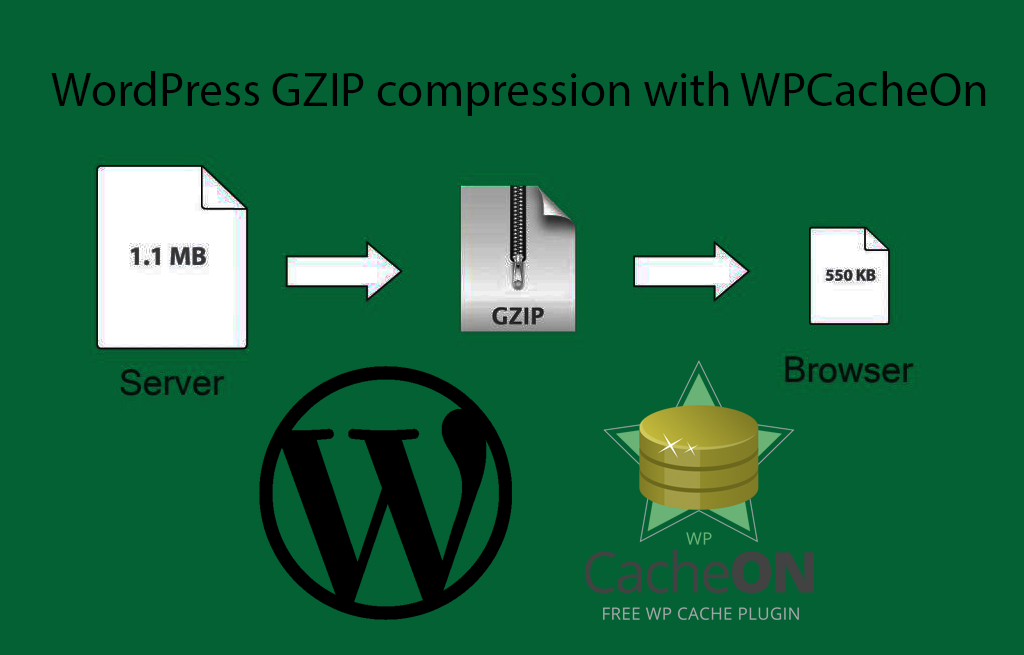
Essentially GZIP is a file format and also software application used for file compression and decompression. GZIP compression should be server-side enabled, which will allow further reduction in the size of your HTML, stylesheets, and JavaScript files. GZIP will not work on images as they are compressed in a different way. We have seen up to 73% reductions due to GZIP compression. This is probably one of the easiest optimizations you could make manually, when it comes to WordPress.
When the web browser request the website content it checks to see if the web server have GZIP enabled. Technically this means that the browser check if the “content-encoding: gzip” response header exist. If the header is detected, the response will be compressed, with smaller files. In case the gzip header do not exist the served content will be from uncompressed files. If you don’t have GZIP enabled, the chance to see warnings and errors in speed testing tools such as Google PageSpeed Insights and GTmetrix is extremely high.
GZIP recommendation in GTmetrix
The old name in GTmetrix to this recommendation is “Enable gzip compression”, it is now changed to “Enable compression”. GTmetrix recommend the GZIP compression so you can reduce the transfer size of the static resources for your website.

How to check if GZIP compression is enabled for your website
GZIP is very common nowadays, and in most of the web hosting providers it is enabled by default. You also do not have to worry about GZIP browser support. This compressing feature have been around for over 17 years. We have gathered list of browsers that can handle the “content-encoding: gzip” HTTP response header:
- Internet Explorer 5.5+ (July 2000)
- Opera 5+ (June 2000)
- Firefox 0.9.5+ (October 2001)
- Chrome (soon after launch in 2008)
- Safari (soon after first launch in 2003)
No matter on which hosting provider you are running WordPress, you should always check and ensure that the GZIP compression is enabled. We will show you few quick and easy ways to check the status of the GZIP compression for your website:
Online GZIP compression check tool
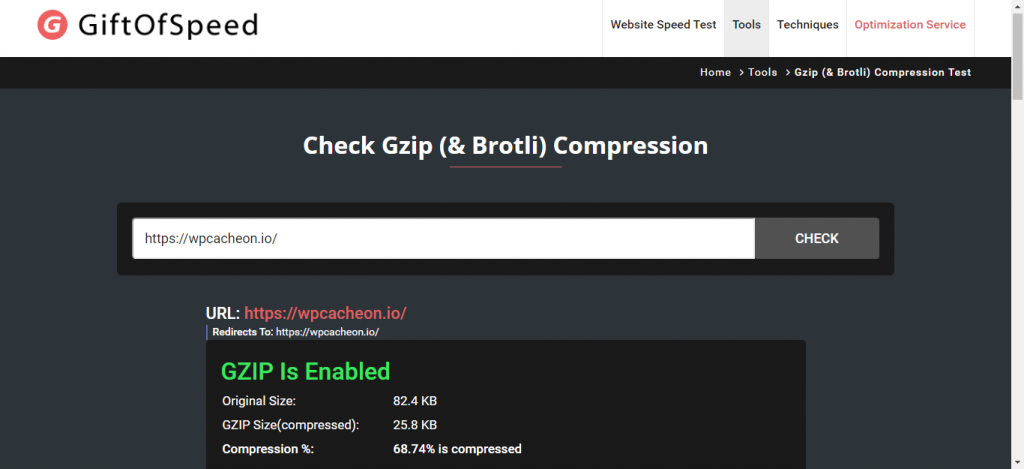
The quickest way to check if GZIP compression is enabled on your WordPress website is to simply head over to GiftOfSpeed free GZIP compression test tool. Simply input your website URL and click on the Check button. Shortly after that the tool will return information about the amount that was saved by compressing the page with GZIP. The other option is to return an error letting you know that GZIP is not enabled. As you can see in our test below, we saved 68.74% of data size with GZIP compression.
Check the GZIP content-encoding HTTP Response Header
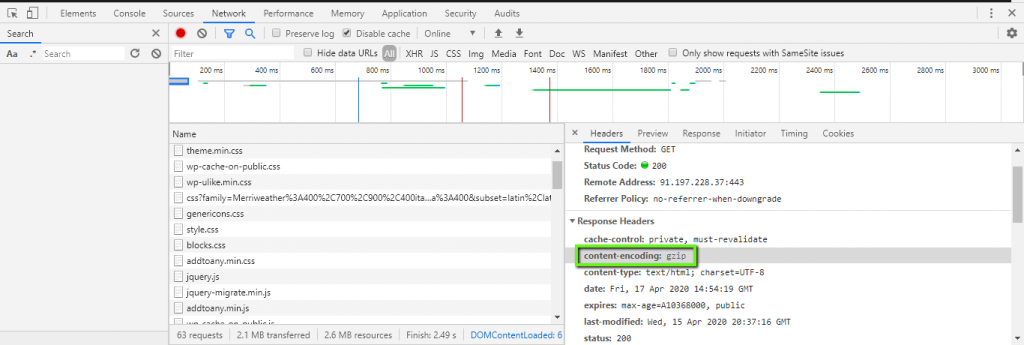
The second way to verify if the “content-encoding: gzip” HTTP response header is active on your website is to actually check the response header. Even if this sounds complicated, it is actually easy. You can open the Chrome Devtools, navigate to Network section and look at content-encoding line in the Response Header.
How to enable GZIP compression
If you don’t have GZIP compression enabled, there are few ways you can enable it on your web server.
Enable GZIP with WPCacheOn Plugin
The first and the easiest way to enable GZIP compression for your website is by using WPCacheOn WordPress caching plugin that enables the GZIP compression for you. WPCacheOn add GZIP compression rules in your .htaccess file, using the mod_deflate module. Some hosts may not allow altering files such as the .htaccess file. In this case you will need to see the next way for enabling GZIP compression.
Enable GZIP on Apache web server
The second way to enable the GZIP compression is by editing your website .htaccess file manually. Many of the shared web hosting services use Apache, in which you can simply add the below code to your website .htaccess file. The .htaccess file is located at the root of your WordPress website. Ensure that you add the code below the current content of the .htaccess file. The file in question can be edited via FTP or the control panel file manager of your web hosting provider.
Important note: Make sure that mod_filter is loaded on the Apache web server, otherwise the AddOutputFilterByType directive will not work and adding the below will cause a 500 Internal Server error. We also recommend checking the error logs if you have any issues with the below code.
# Gzip compression by WPCacheOn
<IfModule mod_deflate.c>
    # Compress all output labeled with one of the following MIME-types
    <IfModule mod_filter.c>
        AddOutputFilterByType DEFLATE application/javascript
        AddOutputFilterByType DEFLATE application/json
        AddOutputFilterByType DEFLATE application/atom+xml
        AddOutputFilterByType DEFLATE application/rdf+xml
        AddOutputFilterByType DEFLATE application/rss+xml
        AddOutputFilterByType DEFLATE application/vnd.ms-fontobject
        AddOutputFilterByType DEFLATE application/x-font
        AddOutputFilterByType DEFLATE application/x-font-opentype
        AddOutputFilterByType DEFLATE application/x-font-otf
        AddOutputFilterByType DEFLATE application/x-font-truetype
        AddOutputFilterByType DEFLATE application/x-font-ttf
        AddOutputFilterByType DEFLATE application/x-font-woff
        AddOutputFilterByType DEFLATE application/x-javascript
        AddOutputFilterByType DEFLATE application/xhtml+xml
        AddOutputFilterByType DEFLATE application/xml
        AddOutputFilterByType DEFLATE font/opentype
        AddOutputFilterByType DEFLATE font/eot
        AddOutputFilterByType DEFLATE font/otf
        AddOutputFilterByType DEFLATE font/truetype
        AddOutputFilterByType DEFLATE font/ttf
        AddOutputFilterByType DEFLATE image/svg+xml
        AddOutputFilterByType DEFLATE image/x-icon
        AddOutputFilterByType DEFLATE text/css
        AddOutputFilterByType DEFLATE text/html
        AddOutputFilterByType DEFLATE text/javascript
        AddOutputFilterByType DEFLATE text/plain
        AddOutputFilterByType DEFLATE text/xml
        AddOutputFilterByType DEFLATE application/x-httpd-php
        AddOutputFilterByType DEFLATE application/x-httpd-fastphp
    </IfModule>
Enable GZIP on NginX web server
If your server is running NginX as a web service, simply add the following to your website nginx.conf file.
gzip on;
gzip_disable "MSIE [1-6].(?!.*SV1)";
gzip_vary on;
gzip_types text/plain text/css text/javascript image/svg+xml image/x-icon application/javascript application/x-javascript;
If you enjoyed our guide, try using the WPCacheOn WordPress caching plugin. The WPCacheOn will enable GZIP compression and many more optimization.