
The WPCacheOn is very lightweight caching plugin that creates static HTML files and store them on the web server where your website reside. This means that static HTML file is delivered when it is possible. This will provide users with the requested data instantly. Otherwise loading the page will involve the resource intensive process of using the WordPress core, plugins and database. Honestly this is simple, yet very powerful plugin, easy to use, without the need of configuration and the best of all it helps improve your website loading time, as well as the user experience.
Installation
The installation of WPCacheOn WordPress caching plugin is easy and can be done in just a few clicks. The steps to install WPCacheOn are:
- Access your website admin dashboard
- Hover over “Plugins” and then from the sub menu choose “Add New“
- Once the page load, you will see the search bar with “Search plugins…” placeholder
- Click on the search bar and write – wpcacheon
- After few seconds the search results will be visible and you will see WPCacheOn, click on the “Install Now” button
- As soon as the installation is completed, the “Install Now” button will be changed to “Activate“, click on this button now
- After the plugin is activated, in few seconds our PreCache™ will generate cache of your website. On the next visit of your website the cached HTML file will be served within a second!
Watch our WordPress plugin installation video down below:
WPCacheOn plugin settings
Caching in every website is very important factor in order to improve the overall performance and user experience of your website. WordPress is no exception! In the next steps we will review what setting we can tweak in the WPCacheOn plugin.
- Once the WPCacheOn plugin is installed per the above steps, navigate to Settings -> WPCacheOn
- As soon as the page load you will see our the following:
Top header section
In the top header section, you will see few important things:
- First one is the plugin version, ensure that you always update WPCacheOn to the latest available version. This will ensure that all of the latest optimizations for your website will be available.
- Link to our WordPress.org profile, you can see more information about us and our activity in the WordPress directory.
- Two options to contact us – one for plugin support and one for help related to your website optimization.
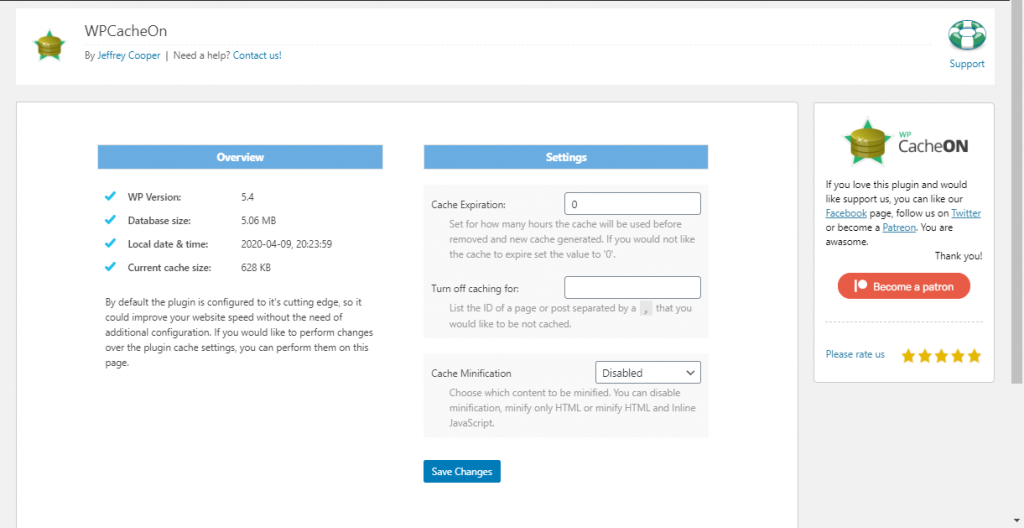
Main menu – Overview and Settings
Next, on the main menu in the “Overview” section, you can see various information related to your website, such as:
- Your current WordPress core version
- Current size of the database used by your WordPress website
- Server local date and time
- The size of the currently generated cache by WPCacheOn
- Information about the default WPCacheOn plugin configuration
In the right side of the main menu, named “Settings“, you can do the following:
- Set Cache Expiration. With this option you can control for how many hours the cache will be used before removed. By default this option is set to 0, which means that the cache expiration is deactivated and the same will be not removed after certain period of time.
- Turn off caching for specific post or page that you would like to be not cached. Simply list the page/post ID number. If there is more than one page/post to be excluded you should separate the ID’s with comma
,symbol. - Cache Minification, with this option you can choose which of the static cached content to be minified. The options are: Disabled – none of the HTML, CSS and JavaScript files to be minified. HTML – as the name suggest only the HTML content to be minified and the last option HTML & Inline JS – is for everything to be minified.
Big and important note here: Modifying any of these settings will flush your website current cache. This is absolutely required due to the nature of the settings.
Appreciation box
The Appreciation box as we called it, is actually the secondary smaller right-hand side menu. In this menu you can check the WPCacheOn plugin social accounts, Patreon support and rate the WPCacheOn plugin on the WordPress.org website.
Features
- Extremely efficient and fast disk cache engine, even greater results with SSD based servers
- Very convenient displaying of the cache size in the admin dashboard
- Automated and manual clearing of the cache
- HTML, CSS and JavaScript minification
- Deactivate caching for specific page
- Purge the cache for specific page
- WordPress Multisite support
- Custom Post Type support
- CSS and JavaScript inline
- PHP 7.4 compatible
- HTTP/2 Focused
- Expiry Directive
More comprehensive information about the WPCacheOn features can be see on our Features page.
How can I check if WPCacheOn is currently working on my website?
You can quickly verify if WPCacheOn is serving the cached version of specific page by logging out of the admin dashboard and then checking the page source code in the footer (last lines) for one of these comments:
<!-- WPCacheOn by @ 10.02.2019 17:45:36 (webp) -->
<!-- WPCacheOn by @ 10.02.2019 17:45:36 (html) -->
<!-- WPCacheOn by @ 10.02.2019 17:45:38 (webp gzip) -->
<!-- WPCacheOn by @ 10.02.2019 17:45:38 (html gzip) -->
You can view the page source code by clicking with the right mouse button on the page and then select the “View page source” option.
After the WPCacheOn plugin is activated two changes will occur:
- Adding the
define('WP_CACHE', true); // Added by WPCacheOnpiece of code in the wp-config.php file - Copies the advanced-cache.php file from the
wp-content/plugins/wpcacheon/includesfolder to the wp-content directory
The X-Cache-Handler: wco-wp header is shown if the advanced-cache.php file is in place. If the advanced-cache.php file is not in the wp-content directory or if WP_CACHE define code is set to false for example – define('WP_CACHE', false); then WPCacheOn will not skip PHP and you will see header such as – X-Cache-Handler: wco-php.
WooCommerce not updating cart
Ensure that you have installed WPCacheOn 2.0.0 or above version and WooCommerce above 1.4.2 version. Then flush the WPCacheOn already generated cache. If the issue is still persist, please Contact Us.
What will happen if new post or page is published?
When new post or page are published the cache is flushed. In this way we will ensure that the newest content will be visible for your website users.
How often is the cache being updated?
- The cache is flushed every time a new page or post are published
- Every time changes are performed on the settings page the cache is flushed
- You can specify when the cache to be flushed from Settings > WPCacheOn in the “Cache Expiration” section. By default this option is set to ‘0’ which means that the cache is never removed automatically
- In the top right hand corner there is button “Flush WPCacheOn!“, which will flush all of the generate cache so far
Is it possible to flush cache only for certain URL?
Yes, this is possible access the URL you would like to flush the cache for logged in the admin dashboard and you will see “Clear URL Cache” button again top right hand corner.
Does WPCacheOn work with the default WordPress permalinks?
No, WPCacheOn does not work with default permalinks. Custom or any other type permalinks are required.
How to use WPCacheOn with a WordPress multisite setup?
Using WPCacheOn plugin on multisite setup is quite straightforward and easy. After the plugin is downloaded you have two options:
- You can activate WPCacheOn via network activation. This will make the caching plugin to work for each site
- You can activate WPCacheOn on each website individually. This is a good option if you would not want to have it enabled for the whole multisite network
Note: All the cache and settings are configured per website. They work individually for each separate website. This means that you can flush the cache on website A, while website B and C retain their cache. In case you need to access the cached files from the filesystem, they are located at /wp-content/cache/wpcacheon/domain.com where domain.com is your website actual domain name.